Back
Contents
1. Manufacture Stock
1.1 Accessing the Manufacture Stock Page
1.2 Booking Overview
1.3 Receiving Overview
1.4 View Screen
2. Stock Take Entry
2.1 Overview
2.2 Performing a Stock Take
2.3 Viewing a previous Stock Take
1. Manufacture Stock
1.1 Accessing the Manufacture Stock Page
To access the Manufacture Stock Page, click on the Products tab and then click Manufacture Stock, (under the Stock Transfers section on the ribbon toolbar) as shown below:

You will then be presented with the screen as shown below:
By default, the page will start in ‘Booking mode’. More information on the screen will be detailed in the Overview section for each respective mode. (Booking mode and Receiving mode.)
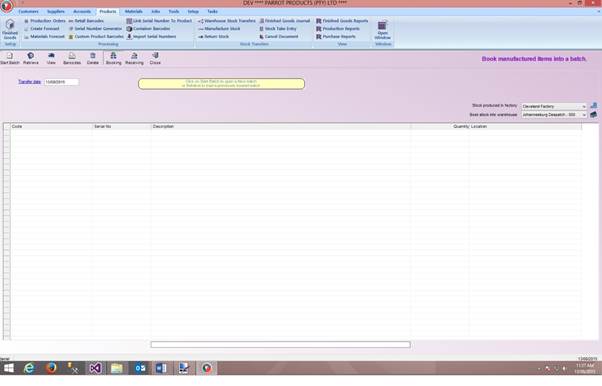
1.2 Booking Overview
Shown below is a screenshot of the various buttons and features that can be changed on the screen (highlighted by the red squares):

In the top left the following options are available:
- Start Batch:This lets you create a new booking batch of manufactured items.
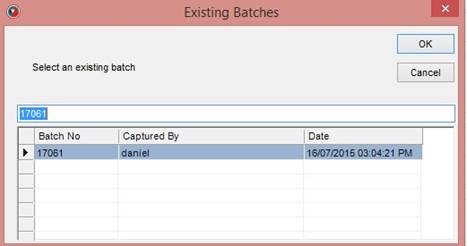
- Retrieve:Clicking this allows you to load a previously saved batch that has not yet been sent to be received yet. Changes can then be made to this batch.
Clicking this presents with the screen shown below where you can select the previously created booking batch:
- View: Clicking this will allow you to search for a specific previous manufacturing batches (this screen will be covered in detail in its own section.)
- Delete: This lets you select and delete an existing batch from the system. (The popup is identical to Existing Batches.)
- Barcodes: This allows you to select a completed batch and print a barcode with the batch number on it.
- Booking: Switches ‘Booking’ mode. (You can start a new batch or edit a previously unfinished batch for manufacturing.)
- Receiving: Switches to ‘Receiving’ mode. (You cannot make new batches and can only select previously finished batches to receive the items into your warehouse stock.)
- Close: This will close the Manufacture Stock Page and mark your Booking as incomplete.
- Transfer Date: The date when the stock is expected to be transferred.
In the bottom right, two dropdown lists are available:
- Stock produced in factory: This lets you select the factory that is manufacturing the stock in the current batch.
- Book stock into warehouse: This lets you select the warehouse the completed stock will be booked into.
After loading a previous batch or clicking the Start Batch button, you will be able to add or edit items to the grid. To lookup product codes, double click on the Code column. You can then enter the quantity of each product that must be booked in for manufacturing. Products that require a Serial Number will requires those to be entered in and be limited to their Serial Number Quantity, as each item would require a unique serial code.
A sample is shown below:
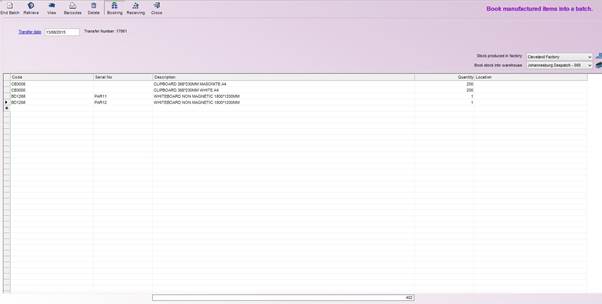
As you can see in the example above, the total items in the batch are displayed below the grid. If you want to remove a row, you can right-click on the row you wish to remove and select Delete Row.
Notice how the Start Batch button has changed to End Batch. Clicking End Batch will finalise this batch and allow it to be received. If you instead click Close the batch will not be finalised and will be able to be edited again at a later time by clicking the Receive button.
Please note that you will NOT be able to finalise the batch if any items that require serial numbers have not been linked to a valid Serial Number.
1.3 Receiving Overview
Clicking on the Receiving button will change the page into ‘Receiving Mode’ from ‘Booking Mode’, as shown below:

You will notice that when receiving a batch, you cannot start at new batches, only retrieve previously booked batches. The rest of the functions on the toolbar remain the same (View, Print Barcodes, Delete and Close.)
When receiving a previously booked bath, the originally booked quantities are hidden and the amount received must be filled in, as shown below:

Once all received quantities have been filled in you may click the Finalise Batch button to finish receiving your manufactured stock into warehouse stock. If there are any discrepancies between the booked batch and the received batch, the following prompt will be displayed:

These screen will ask you to confirm the quantities are incorrect. Please note that this will only be displayed to supervisors and users with the required rights, who will then check the batch again and if there is still a discrepancy, modify the quantities appropriately and confirm the changes by clicking Save. The verified amounts will then be saved to stock.
1.4 View Screen
By clicking on the View button you will be presented with the screen below:
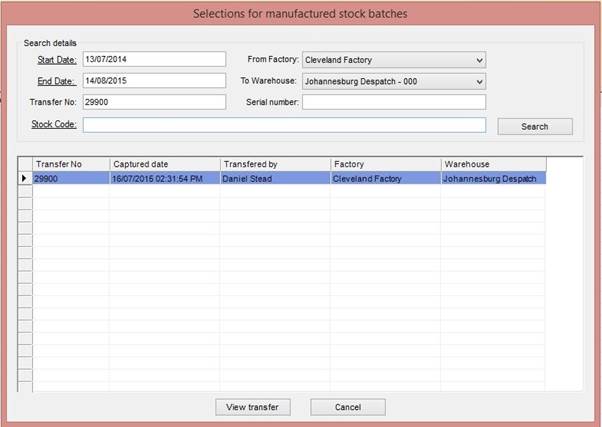
You can enter various filters for your search, each one being described below:
- Start Date: Specify the starting date for your search.
- End Date:The ending date for your search.
- Transfer No: If you only wish to show records for a specific Transfer Number, you can enter it here.
- Stock Code: Only shows transfers for the specific Stock Code entered here. Double click on the text to popup the Finished Goods Lookup.
- From Factory: Select the factory the transfer was from that you wish to search for.
- To Warehouse: Select the warehouse the manufactured stock was transferred to.
- Serial Number: If you wish to search for a batch that has a specific Serial Number, you can enter it here.
Once you are done specifying your parameters, click Search and any transfers that match your criteria will be shown in the grid. If you select a result and click View transfer you will be presented with the following report, showing the items on the selected batch:

2. Stock Take Entry
2.1 Overview
To access the Stock Take Entry page, click on the Products tab and then click on Stock Take Entry (under the Stock Transfers section on the ribbon toolbar), as shown below:

You will then be presented with the screen as shown below:
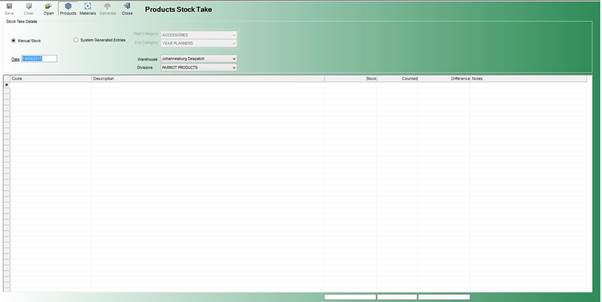
Circled in the picture below are the various options on the toolbar and what function each one performs:
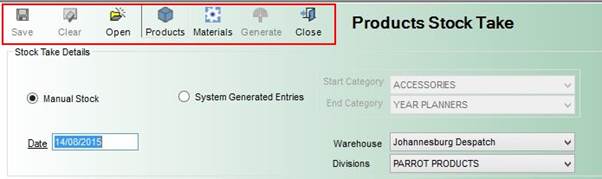
The buttons on the toolbar circled in red perform the following functions:
- Save: Saves the current Stock Take to the system.
- Clear: Clears the Stock Take grid of all stock items.
- Open: Allows you to select and view a previous stock take. (Covered in more detail in its own section.)
- Products: Selecting this button signals that you are taking a stock take for Finished Goods (Products) and changes the Warehouses and Categories appropriately.
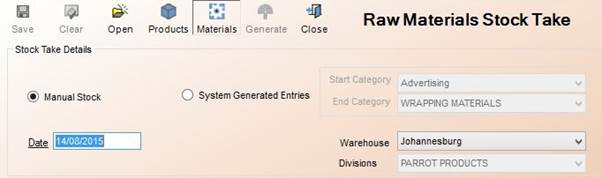
- Materials: Selecting this button signals that you are taking a stock take for Raw Materials and changes the Warehouses and Categories appropriately. (Sample of how the form changes below) :
- Generate: If you have selected System Generated Entries, clicking on this button will automatically generate the lines for the grid for each Stock Item from the Start Category to the End Category for the selected Warehouse.
- Close: This closes the Stock Take Entry Page without saving any changes.
Shown below are the various Stock Take options available for the Stock Take:
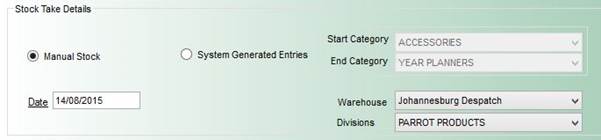
- Manual Stock: This allows the user to manually input the Stock Codes for this specific Stock Code rather than allow the user to select the Categories and automatically generate the stock item lines.
- System Generated Entries: Selecting this and then clicking the Generate button will make the system generate the stock codes for every item from the selected Start Category to the End Category.
- Date: Enter the date the stock take is being performed on here.
- Start Category: Used to control the starting category of Stock Items for a System Generated Entry.
- End Category: Used to control the ending category of Stock Items for a System Generated Entry.
- Warehouse: Select the warehouse that the stock take entry is for from this dropdown menu.
- Divisions: Select the division (if applicable) that this stock take entry is for from this dropdown menu.
2.2 Perform a Stock Take
In this example, we will be using the System Generated Entries to generate the stock item lines. If you are performing a Manual stock take you will need to enter the product codes for each line. (You can double-click on the Code column to show a product code lookup.) For this sample, the category range has been kept small. Shown below is what the automatically generated entry will show you:
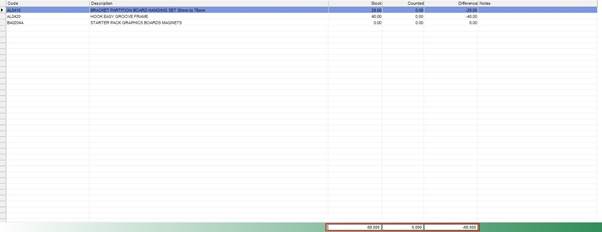
Now you can enter the actual counted amount for each item compared to the system stock in the Counted column. The Difference column will reflect any discrepancies between the Stock and Counted items. You can add a Note for a stock item if necessary by clicking on the column and entering the text. Circled in red at the bottom of the grid are the total count for Stock, Counted and the total Difference for all stock items in the grid. Once you are done with the Stock Take, clicking Save will save it to the system.
Please note that if you are using the System Generated Entries mode you cannot add additional lines to what the system generates. If you wish to do that, you will need to do a Manual stock take.
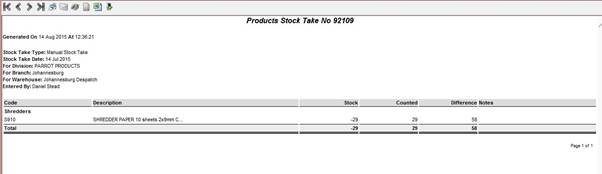
2.3 Viewing a previous Stock Take
If you want to view a previous Stock Take, you can click on the Open button on the toolbar. You will then be presented with the screen below:
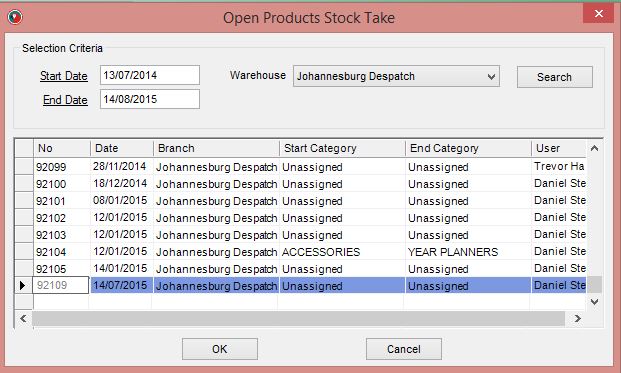
You can filter the previous Stock Takes you wish to view by the following criteria:
- Start Date: The starting date you wish to search for stock takes from.
- End Date: The ending date you wish to search for stock takes from.
- Warehouse: The warehouse you wish to search for previous stock take records on.
After you have selected the record you wish to view, clicking OK will display the following report: