Back
Contents
1. Setting up Courier Companies
1.1 Overview
1.2 Courier Company Settings
1.3 Linking the courier company to a Delivery Zone
2. Courier Reconciliation
2.1 Accessing courier reconciliation
2.2 Creating a new Batch
2.3 Overview of Waybill Reconciliation
2.4 Adding a new record to a batch
2.5 Importing records into a batch
2.6 Additional functions on a Courier Recon Batch
2.7 Editing an existing Recon Batch
2.8 Submitting a batch for GRN
1. Setting up Courier Companies
1.1 Overview
In order for a courier company to have its fees automatically calculated by the Parrot ERP Program, a Supplier representing the courier company must first be created. Once this has been done, the courier company can be linked to a module which will calculate the fees and display the amount on an order/invoice or quote. To view all the current courier companies, click on the Setup tab and then click on Couriers (as shown in the figure below.)

You will then be presented with the screen shown below:
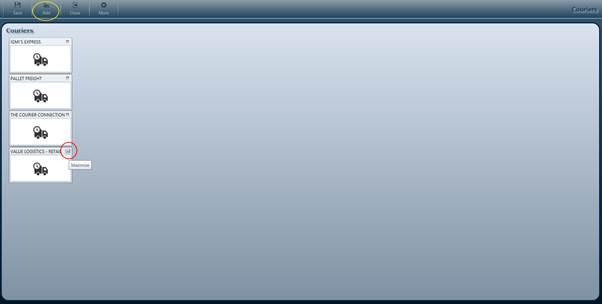
Click on the square box (circled in red) next to the courier company’s name to view the details for a specific courier. Alternatively, you can also add a new courier company by clicking the Add button (circled in yellow) which will then present you with the screen shown below, which will allow you to link a Supplier to a new Courier company.
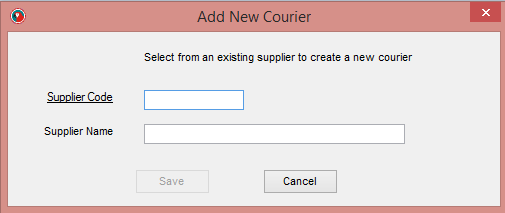
Clicking on the underlined Supplier Code will display a lookup where you can search for the supplier you wish to link to the courier company. Clicking save will then add the new courier company.
1.2 Courier company settings
Shown below is the screen you are presented with if you either add a new company or have clicked on the square next to an existing courier company.
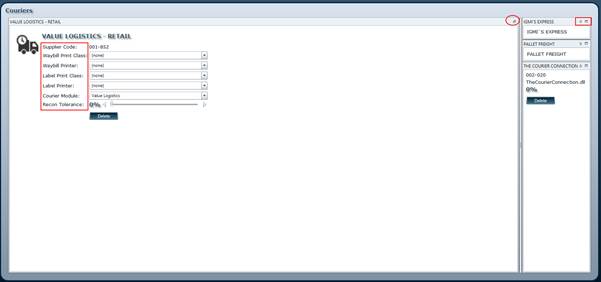
Shown on the right (circled in red) are two small squares which will minimize the current company and not show its details. Further to the right are two clickable buttons, an arrow and a square. The arrow will show a different companies’ details in a condensed view (as seen with The Courier Connection), whereas the square will maximize the company you clicked on (showing you its details in the full screen) and minimize the currently displayed company.
On the left, highlighted in the red square, are various options specific to the selected courier company (everything except the Supplier Code may be changed):
- Supplier Code: This is the supplier the courier company is linked to.
- Waybill Print Class: This controls the format a waybill for this company will be printed in.
- Waybill Printer: This is which printer will be used to print a waybill.
- Label Print Class: This controls the format for labels that this courier company will be printed in.
- Label Printer: This is which printer will be used to print labels.
- Courier Module: This is the module that will be used to calculate the fees for this courier company. It will contain a list of destinations and origins specific to the courier company.
- Recon Tolerance: This used to set a percentage amount of variance in courier charges that the system is willing to tolerate. (I.e. charges could be allowed to be 10% more than what the system calculates them to be.) Click and hold in the left-mouse button over the slider to drag it and increase or decrease the percentage.
If the company is no longer needed, it can be removed by clicking the Delete button. To save any changes, click the Save button.
1.3 Linking the courier company to a Delivery Zone
In order for a courier company to be have its fees calculated by Parrot, it must first be linked to a Delivery Zone. Under the Setup tab, click Branches.

You will be presented with the screen below:
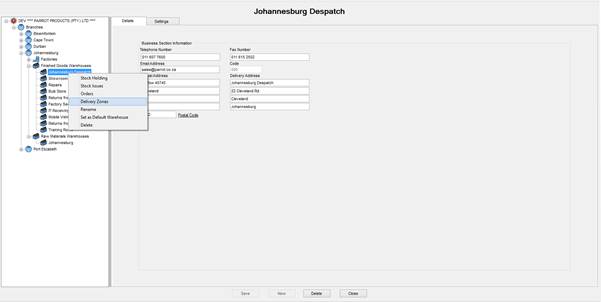
Click on the + to display all the Branches, clicking on any of the + signs next to the branches will display all Factories, Finished Goods Warehouses and Raw Materials Warehouses associated with the specific Branch. Clicking on any expanded item again will collapse it and hides its details. To access Delivery Zones, right click on a Finished Goods Warehouse and select Delivery Zones from the popup menu. The screen will then change as shown on the next page:
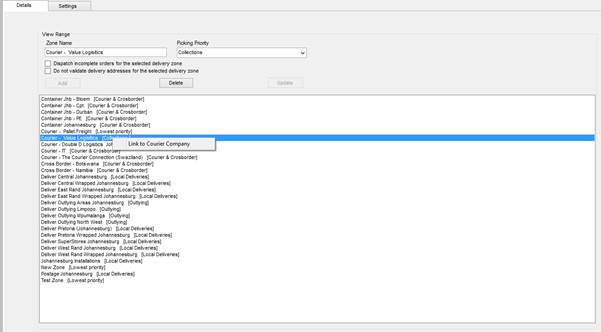
Once the screen has loaded the Delivery Zones, you can right-click on a zone and select Link To Courier Company from the popup menu. You will then have the option to select the courier company and select the origin (starting point) from which the fees will be calculated from.
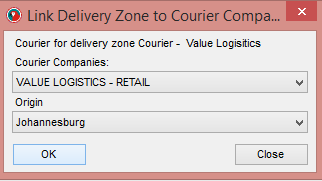
Click OK and then Save your changes. If a Delivery Zone that is linked to a Courier Company is selected on an Order/Quote/Invoice, the appropriate fees for the selected destination will be displayed in addition to the normal cost totals. A sample of this will be shown on the next page:

As you can see above, if you select the Delivery Zone associated with the Courier, you will be able to select a Destination from the dropdown list and then the Courier Fees will be shown as part of the Overall Totals at the bottom of the screen.
2 Courier Reconciliation
2.1 Accessing courier reconciliation
In order to perform a courier reconciliation, a new recon batch will need to be created. In order to do this, click on the Suppliers tab and then click on Courier Reconciliation, as show in the screen below:

You will then be presented with the screen shown below:
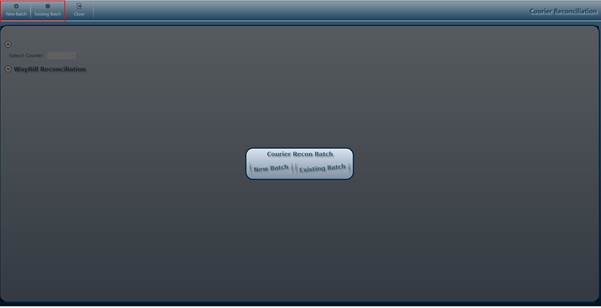
You can then create a new recon batch or edit an existing one. You can also use the buttons on the top right hand side (highlighted by the red square) to do so even while you are busy editing a recon batch.
2.2 Creating a new Batch
When New batch is clicked you will be presented with the screen shown below:
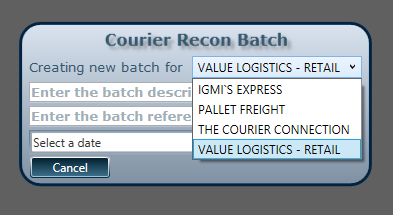
You will then be required to select which courier company the recon batch is for, enter a Description for the batch and enter a batch Reference Number, as well as enter the date of the courier recon.
2.3 Overview of Waybill Reconciliation
Once you have a created a new batch, you will be presented with the screen shown below:
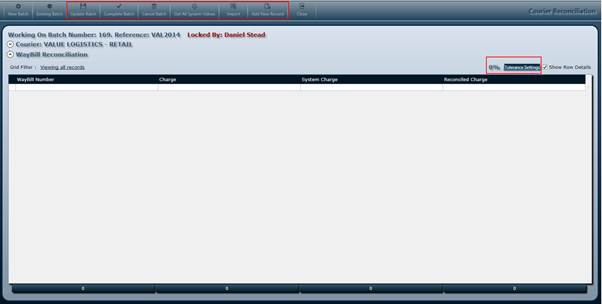
The buttons highlighted by the red squares are described below:
- Update Batch: Saves any changes you have made to this batch. The batch will remain open to editing by you or another user.
- Complete Batch: Marks the batch as complete and ready for GRN Processing. You cannot make any changes to the batch after clicking this.
- Cancel Batch: This will cancel the currently selected batch and remove it from the system.
- Get All System Values: This will attempt to find all System Charges for any entered Way Bill Numbers that have been entered into the batch so far.
- Import: This allows you to import charges from an external file that the courier company has sent you. (This will be covered in more detail in the Importing Records into a batch section.)
- Add New Record: This will add a new row to the grid, which will allow you to add a new WayBill Number as part of the current Reconciliation batch.
- Tolerance Settings: This percentage is the amount of variance in fees you are willing to tolerate for this specific batch only. This can be different for the overall Recon Tolerance that is set for the courier company itself. This can be calculated based on System Values or Imported Values.
2.4 Adding a new record to a batch
If you click on Add New Record you will be presented with the screen below, where you can enter the WayBill Number. (Note that to see if there any source documents, you will need to tick Show Row Details and then select the row.) After entering the waybill number, deselect the row to be presented with options shown below:
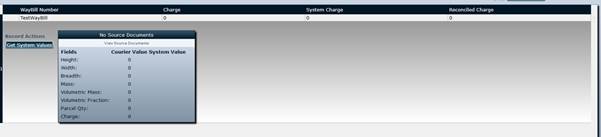
Here you can edit the courier values for various parts of the waybill, such as Height, Width, Breadth, Mass, Volumetric Mass, Volumetric Fraction, Parcel Qty (Quantity) and Charge. You can then click on Get System Values to compare these to the values the system calculated for the invoice. If a WayBill Number does not link to an invoice you will see the following notification popup. (Note that you can hover over the small icons next to the WayBill name for a description of what each means)

You can then click add waybill document to create a document on the system for this waybill number. After doing this, click Get System Values again and you will be presented with the screen below:
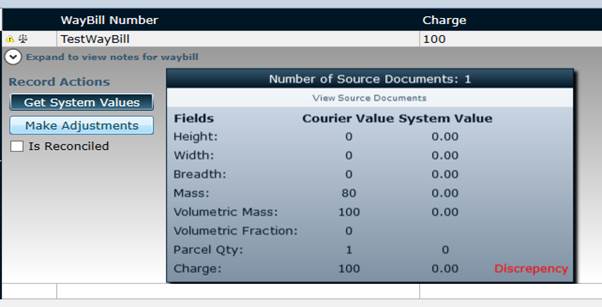
If you click on Make Adjustments you will be able to change the system values for this WayBill Number. Once you are done with any changes, you can check the Is Reconciled checkbox where you will then be required to enter a Description and Reference for the WayBill Recon Discrepancy Report and the total amount that will be claimed will be displayed (if applicable), as shown below: (Note that records with no discrepancy are marked by the Green flag)

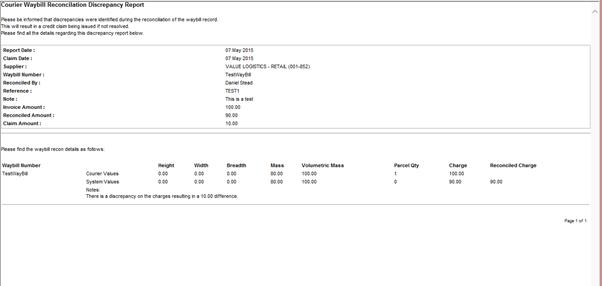
If you click on Generate Discrepancy Report, then click View Report you will be shown a report of any differences between the values from the courier company and values from the system. Note that you cannot view a discrepancy report for a waybill whose values match the system’s. An example report is shown below:
2.5 Importing records into a batch
As an alternative to manually inputting the courier values for each waybill number these values can be imported from an existing file.
Clicking on the Import button will present you with the Import Wizard, shown below:
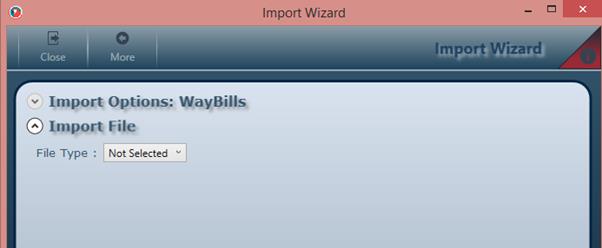
The system currently supports the following file types for importing:
- · .csv (Comma-Separated Values files)
- · .xlsx/xls (Microsoft Excel files)
- · .txt (Delimited Text files)
For this example, we will be using a Microsoft Excel Spreadsheet (.xlsx) file. Look at the spreadsheet below:

To import these values into the system, select Excel File from the dropdown list in the Import Wizard and then click Browse File and select the Excel file.

You will then be presented with the screen below:
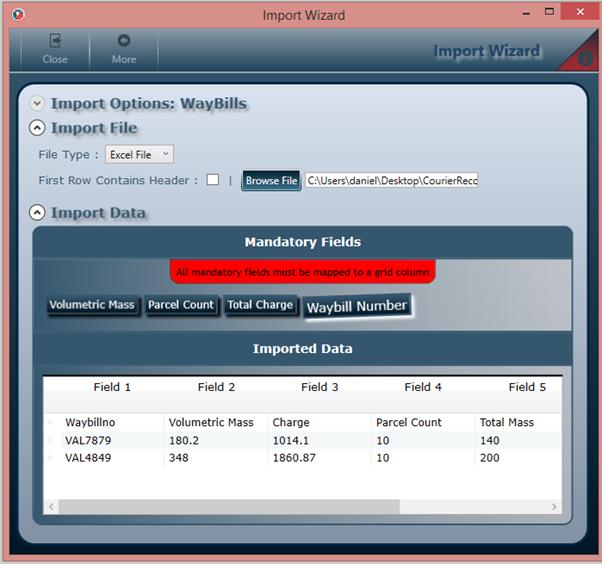
Firstly, for the case in this example, you will need to check the First Row Contains Headers checkbox, so that the system knows to ignore the first row as it only contains the headings for each column.
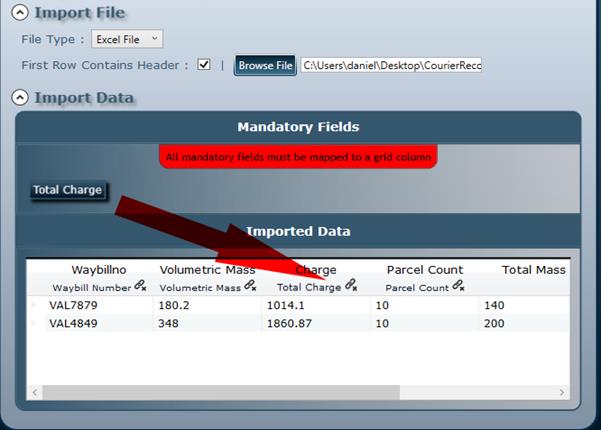
To map a Mandatory Field to a grid column, simply hold the left-mouse button on the field you want to drag and then drag it over the Column Heading in Imported Data you wish to map the field to, as shown below (the dragging is marked by the red arrow):
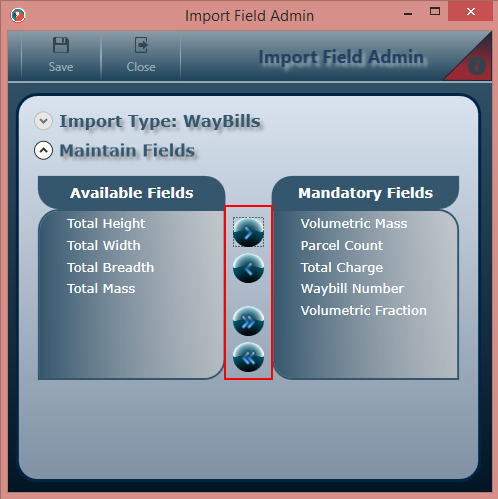
To change the Mandatory Fields, click on the More button on the top toolbar and then click on Field Admin.

You will then be presented with then screen below, where you can modify the Mandatory Fields by selecting any field on the right and clicking on the arrow to move it to the left. (Or remove Mandatory fields by doing vice versa) Clicking on the double arrows will move ALL fields from the right to the left or vice versa. In the example below, Volumetric Fraction has been made a Mandatory Field.
Click Save once you are happy with the changes or Close to cancel any changes. Back in the Import Wizard, once you have mapped all mandatory fields, you can click Use Data to complete the importing process.

The Courier Recon Batch will then be updated with the imported data. After doing this, click Get All System Values and, as when after manually entering a record, any discrepancies will be flagged.
2.6 Additional functions on a Courier Recon Batch
You can add view notes for a way bill by clicking on the arrow next to Expand view notes for waybill, just above record actions. You can then add a note about the specific row in the Recon batch or view/delete existing ones (shown below):

To delete a record from the Courier Recon Batch, right-click on the row and select Delete Waybill.

You can also filter the grid by hovering the mouse over Viewing All records and selecting your desired filtering.
Once you are done editing, either mark the Recon as complete by clicking Complete Batch or update the current details (without marking it as completed) by clicking Update Batch.
2.7 Editing an existing Recon Batch
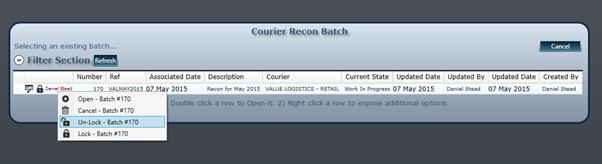
When clicking on Existing Batch rather than creating a new batch, you will be presented with the screen shown below:

This will display any existing batches. Note that if the batch is Locked to a User (seen in the picture in red letters next to the lock icon), it means that the user is currently busy with editing that specific Recon batch. In order for another user to edit the batch, the user who has locked it must right-click on the record’s row and select Un-lock, as shown below:
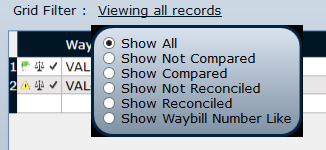
You can also Cancel the batch from this screen, Open the batch or Lock any batch that is not currently locked to your own account for editing. Clicking the Refresh button will refresh the contents of the grid. Finally, you can also filter the grid by clicking Filter Section where you will be presented with the various filtering options as shown below:

Options for filtering include: Current State (of the batch), Courier (the courier company the batch is for), Updated By (lets you filter by which user updated the batch last), Associated Date, Batch Number and Reference. Once you have selected any filter options, click Refresh to allow the grid to filter to your selected constraints.
2.8 Submitting a batch for GRN
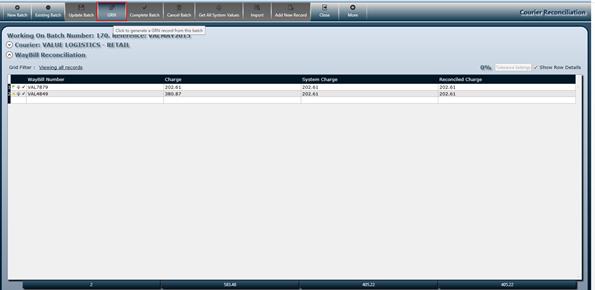
Once a batch has been marking as completed, you will have the option to submit it for GRN, as shown below:
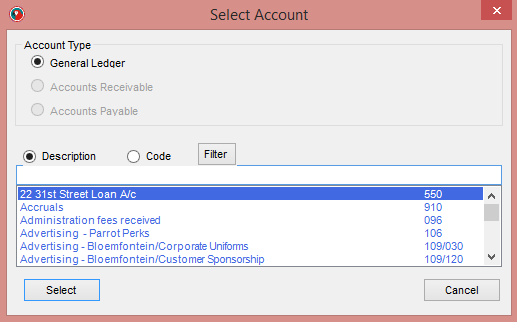
Once you have clicked this you will be presented with the Generate GRN Record screen. You will be required to enter an Invoice Number, a Description, a footnote for the Claim and to select the GL Account for the record by clicking on the underlined Account text (circled in red) as shown below:
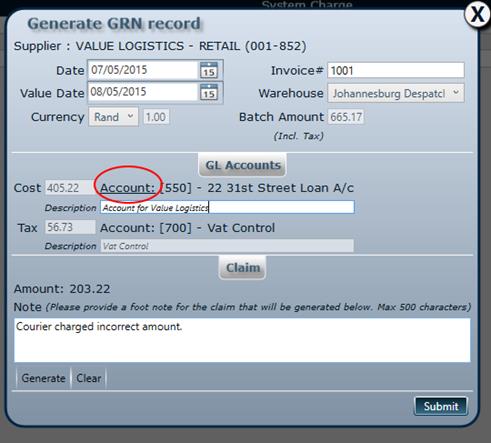
Clicking on Account presents you with a menu where you can select the GL Account.
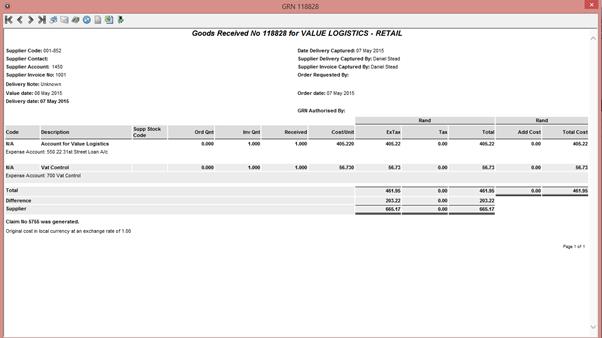
Once you can are done filling in the details, you can click Submit, a GRN No will be generated as shown below:
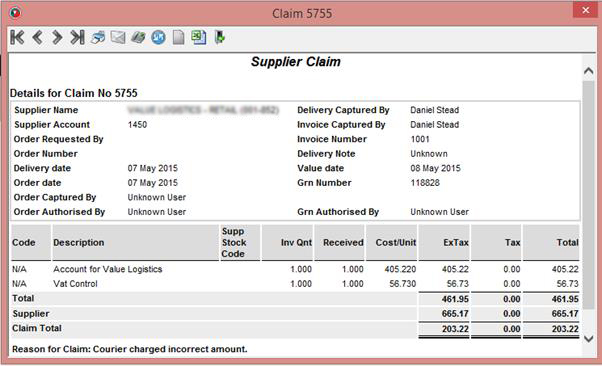
If the courier overcharged, a claim will also be generated, as shown below:
The Recon batch will also be updated with the GRN Number as shown below:
